


こんにちは。ムツ吉です。
先日reactでhtmlのプレビュー付きエディタを作ることをしたので自身の備忘録として。
(「react初心者にいきなり難易度高すぎるわ!」と思いながらもなんとかここまでやれたwちなみにreact歴1か月ほど。コンポーネントってなんやねーーん!)
これ系の記事が全然なかったので参考にしていただけたらです♪
【完成】こんな感じ
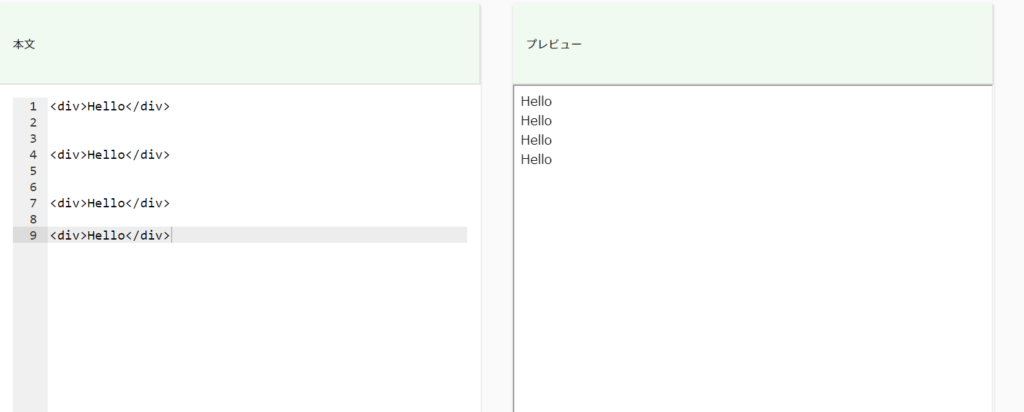
コードはこんな感じ
import React, { useState, useEffect, useCallback } from 'react';
import { useHistory, useLocation, useParams } from 'react-router-dom';

import TableBody from '@material-ui/core/TableBody';
import TableCell from '@material-ui/core/TableCell';
import TableContainer from '@material-ui/core/TableContainer';
import TableRow from '@material-ui/core/TableRow';
import Grid from '@material-ui/core/Grid';
import Paper from '@material-ui/core/Paper';
import Table from '@material-ui/core/Table';
import Button from '@material-ui/core/Button';

// editorツール
import AceEditor from 'react-ace';
import 'ace-builds/src-noconflict/mode-html'; // 要らないかも?


/**
 * HTMLエディタを返す
 *
 * @param {boolean} isEditor editorを表示するかどうか true:表示、false:非表示
 * @param {object} classes tableのクラス
 * @return {React.Component} HTMLエディタ
 */
const getHtmlField = (isEditor, classes) => {
  // editorの初期値変更できる
  const [val, setVal] = useState('<div>Hello</div>');

  const state = location.state || {};
  const history = useHistory();


  useEffect(() => {
    const timerId = setInterval(() => setStart(HTML), 2000);
    return () => clearInterval(timerId);
  }, [val]);

  // エディタ設定
  const editor = (
    <>
      <AceEditor
        mode="html"
        theme="monokai"
        onChange={handleChange} // 入力動作をする度に発火する
        name="UNIQUE_ID_OF_DIV"
        value={val}
        editorProps={{ $blockScrolling: true }}
        width="100%"
        showPrintMargin={false}
        fontSize={17}
      />
    </>
  );

  // HTMLの初期値
  const HTML = `<!doctype html>
<html>
  <head>
    <meta charset="utf-8">
    <title>playground</title>
    <style>${'css'}</style>  // cssつけたいならここに処理が来るように記入可
  </head>
  <body>
    ${val}
    <script>${'js'}</script> // jsつけたいならここに処理が来るように記入可
  </body>
</html>
`;

    // 入力した文字をプレビューに反映する処理
 const [html, setStart] = useState(HTML);
  const handleChange = (html) => {
    setVal(html);
  };
  const preview = (
    <div>
      <iframe height="530px" sandbox="allow-scripts" width="100%" className="content" srcDoc={html}></iframe>
    </div>
  );

  if (isEditor)
    return (
      <>
        <Grid container spacing={5}>
          <Grid item xs={6}>
            <TableContainer component={Paper}>
              <Table aria-label="custom pagination table" style={{ height: '500px' }}>
                <TableBody>
                  <TableRow className={classes.tc}>
                    <TableCell>本文</TableCell>
                  </TableRow>
                  <TableRow>
                    <TableCell>{editor}</TableCell>
                  </TableRow>
                </TableBody>
              </Table>
            </TableContainer>
          </Grid>
          <Grid item xs={6}>
            <TableContainer component={Paper}>
              <Table aria-label="custom pagination table">
                <TableBody>
                  <TableRow className={classes.tc}>
                    <TableCell>プレビュー</TableCell>
                  </TableRow>
                  <TableRow>{preview}</TableRow>
                </TableBody>
              </Table>
            </TableContainer>
          </Grid>
        </Grid>
      </>
    );
};

export default getHtmlField;
実装イメージ
1.左側をエディタっぽくする(行数が縦ぶ12345・・・と表示されるようなやつ)
AceEditorっていうのでできました。
2.入力したものがリアルタイムで別箇所に表示されるようにする
AceEditorの中にonChangeを書き込めるのでそこにuseStateを付けるとonChangeが発火する度にhtmlの中の値がその時の入力したものが入るようになる。(setStartよりsetHtmlの方がわかりやすいねw)
useStateの初期値としてconst HTMLの値をもっておくと実際に記入する時はhtmlのbodyの中身を直接入力できるようになるから楽です♬
  <AceEditor
        mode="html"
        theme="monokai"
        onChange={handleChange} // 入力動作をする度に発火する
        name="UNIQUE_ID_OF_DIV"
        value={val}
        editorProps={{ $blockScrolling: true }}
        width="100%"
        showPrintMargin={false}
        fontSize={17}
      />

 const [html, setStart] = useState(HTML);
  const handleChange = (html) => {
    setVal(html);
  };

  // HTMLの初期値
  const HTML = `<!doctype html>
<html>
  <head>
    <meta charset="utf-8">
    <title>playground</title>
    <style>${'css'}</style>  // cssつけたいならここに処理が来るように記入可
  </head>
  <body>
    ${val}
    <script>${'js'}</script> // jsつけたいならここに処理が来るように記入可
  </body>
</html>
`;
3.プレビューで書いたhtmlが表示されるようにする
iframeのsrcDocというので書いたhtmlがそのまま表示されるので、
2で書いたものがこの中に入るようにすればOK。
iframeのsrcDocについてはこちら。
    <div>
      <iframe height="530px" sandbox="allow-scripts" width="100%" className="content" srcDoc={html}></iframe>
    </div>
終わり
上記のような感じでなんとかできました。
あとは↑で記述したhtmlをawsのS3にファイルをアップするみたいなこともやるので、それがわかったらまた記述します。(react初心者にホンマ酷やで・・)

コメント