


railsのapiモードを始めて触ったのでその時の備忘録として記事にしました。
既存のアプリケーションを変更APIモードにする

参考資料:https://railsguides.jp/api_app.html
1.config/application.rb のApplicationクラス定義の冒頭に、次を追加します。
config.api_only = true2.app/controllers/application_controller.rb の以下のコードを置き換えます。
class ApplicationController < ActionController::Base
end
上を以下に変更します。
class ApplicationController < ActionController::API
end
Talend API Tester を使う
参考資料:https://techtechmedia.com/talend-api-tester/
getレスポンスの確認(index)
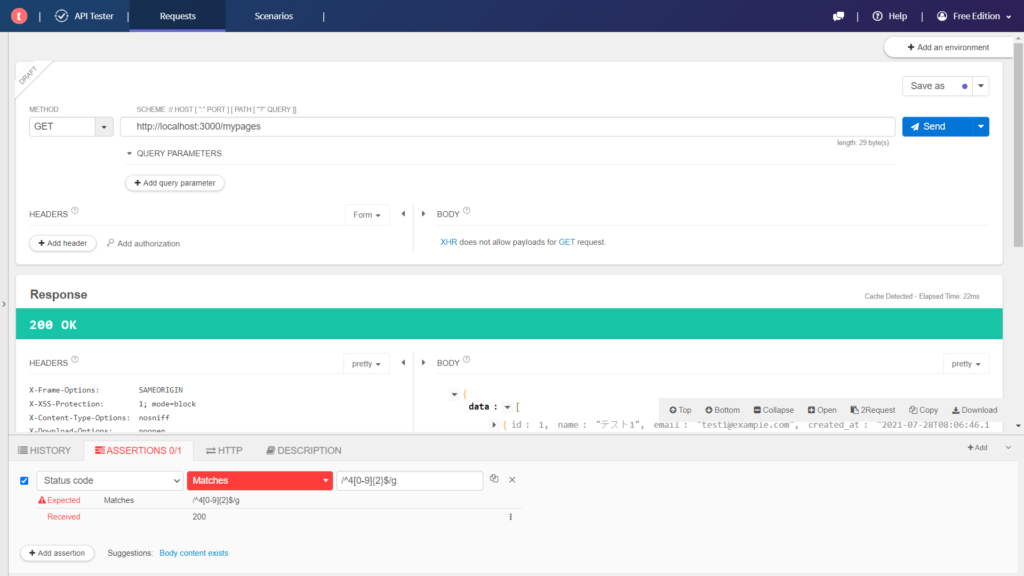
1.メソッド→GET
2.http://localhost:3000/mypages
(mypagesはコントローラ名を指定している)
3.[send]
レスポンスを確認
{
"data":[
{"id": 1, "name": "テスト1", "email": "test1@example.com", "created_at": "2021-07-28T08:06:46.168Z",…},
{"id": 2, "name": "ああああ", "email": "a@a", "created_at": "2021-08-05T02:30:55.160Z",…},
{"id": 3, "name": "b", "email": "b@b", "created_at": "2021-08-05T02:31:12.391Z",…},
{"id": 4, "name": "c", "email": "c@c", "created_at": "2021-08-05T02:31:23.230Z",…},
{"id": 5, "name": "テスト~", "email": "a@af", "created_at": "2021-08-05T06:48:52.005Z",…},
{"id": 6, "name": "テストだ", "email": "a@afga", "created_at": "2021-08-05T07:08:19.070Z",…}
]
ソースコード
  def index
    users = User.all
    render json: { data: users }
  end
postレスポンスの確認(create)

1.メソッドをpostに変更する
2.http://localhost:3000/mypages
3.[QUERY PARAMETERS]を選択→[Add query parameter]を選択(何度でも追加できる)
4.
nameのところに[user[name]]、valueのところに[テスト]
nameのところに[user[email]]、valueのところに[fafa@fafa]
nameのところに[user[password]]、valueのところに[111111]
5.[send]
レスポンスを確認
{
"id": 7,
"name": "テスト",
"email": "fafa@fafa",
"created_at": "2021-08-05T08:38:23.966Z",
"updated_at": "2021-08-05T08:38:23.966Z"
}
ソースコード
  def create
    user = User.new(user_params)
    if user.save
      render json: user, status: :created
    else
      render json: user.errors, status: :unprocessable_entity
    end
  end
private
  def user_params
    params.require(:user).permit(:name, :email, :password)
  end
postレスポンスの確認(update)

1.メソッドをputに変更する
2.http://localhost:3000/mypages/2
(/2でidを指定)
3.[QUERY PARAMETERS]を選択→[Add query parameter]を選択(何度でも追加できる)
nameのところに[user[name]]、valueのところに[aaaaaafafa]
4.[send]
レスポンス
{
"data":{
"name": "aaaaaafafa",
"email": "a@a",
"id": 2,
"created_at": "2021-08-05T02:30:55.160Z",
"updated_at": "2021-08-05T08:45:26.024Z"
}
}
ソースコード
  def update
    if @user.update(user_params)
      render json: { data: @user }
    else
      redirect_to edit_mypage_path(@user), notice: '更新できませんでした!'
    end
  end
private
  def user_params
    params.require(:user).permit(:name, :email, :password)
  end
デバッグ
「binding.pry」を使うことができるのパラメータの確認などができます。
感想
今回、railsのapiモードについて初めて触ったので備忘録として記事にしました。
触ってみると楽しいですね♪


コメント